HIGH-PERFORMANCE, LOW-TECH
  • Projects
    • Environment Box
    • Passive Refrigeration
    • Water Cooling
    • Fog Catching
    • Roof Geometries
    • Optimal Insulation
    • Cooler Windcatcher
    • Green Machine
    • Mitigating Humidity
    • Convective Air Flow
    • Styrene Reuse
    • Thermal Reflection
    • ETFE Rigidification
    • Phase Change Materials
    • Polar Reflection
    • Cavity Depth Variation
    • Vapor Permeability
    • Algae Facade
    • Moisture Buffering
    • Engineered Geometries
    • Recycled Desiccant Materials
    • Living Wall
    • Solar Shading Facades
    • SHADESin.reACTION
    • Low-Fab Dehumidification
    • Breathing Wall
    • Urban Heat Island
    • Acoustical Design
    • Latent Heat of PCM's
    • Insulative Qualities of Air
  • About
  • Lectures
    • Building Science Basics I
    • Building Science Basics II
    • Research & Literature Review
    • Scales of Fabrication
    • Electronics
    • Methodology
    • Graphical Excellence
    • Moving Graphics
  • Assignments
    • 1: Research Proposal
    • 2: Prototype
    • 3: Data
    • 4: Design Proposal
    • Presentation & Paper
  • Workshops
    • Thermal Scavenger Hunt
    • Balance Point Game
    • Advanced Shop Training
    • Basic Electronics
    • Advanced Electronics
    • Excel & Illustrator
    • Data Visualization
    • Videos
    • Animations
  • Syllabus
  • Resources

METHODOLOGY


​
PRE-EXPERIMENT STEPS:
  1. In a temperature-controlled setting, set the temperature of the room to a cold temperature (I used 66 degrees Fahrenheit as a baseline since I couldn't access a colder environment, but any temperature will work). Let it run for at least 30 minutes to make sure the temperature becomes relatively constant.
  2. Turn on the Elegoo computer and make sure the Arduino program is running the script properly. Check the serial monitor to ensure the interior and exterior sensors are reading the same temperature to begin with.
  3. Once the temperature reaches a constant, take the first test material and attach it to the open face of the box. Do this by removing the wing nuts and front plate, and sandwiching the fabric between both plates. You can use an extra set of hands, or a tiny bit of tape to hold it up as you tape it. Screw the wingnuts back into place.


EXPERIMENT STEPS:
  1. With the testing material secured to the testing device, set a timer for 30 minutes. At the same time, plug in the extension cord attached to the lightbulb to turn it on.
  2. Check the serial monitor periodically to make sure it's taking readings frequently. You can set the script to take recordings however often you want, but I recorded every 5 minutes.
  3. After 30 minutes, set a new timer for 15 minutes and unplug the light bulb. Record the falling temperature for 15 minutes before the testing is done.
  4. Remove the front face plate and the testing material to let out the air. Monitor the interior temperature until it returns to the base you started at.
  5. If you were testing one or two layers of a material, then replace the layers and add another one. If you just tested a stack of three layers, move onto a layer of the next material.
  6. ​Return to Experiment Step 1.

​
Picture
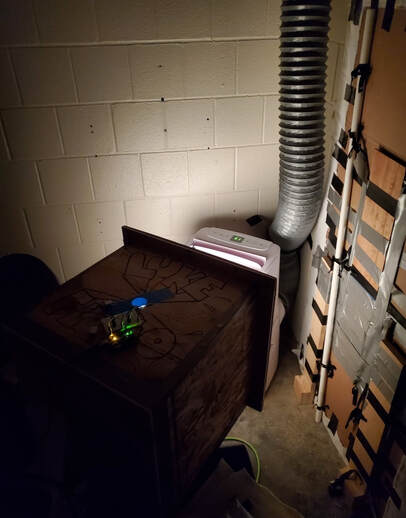
Above: Fig. 22 - Light shining through the open face of the box during a test. it's facing the opening to the AC unit, however the air current is aimed above the box instead of aimed at it.
Below: Fig. 23 - My living quarters during the 4 days I ran tests. I had to cut out human contact during these tests to keep the room at a constant temperature, so I'm still trying to re-enter society after all that solitary confinement.
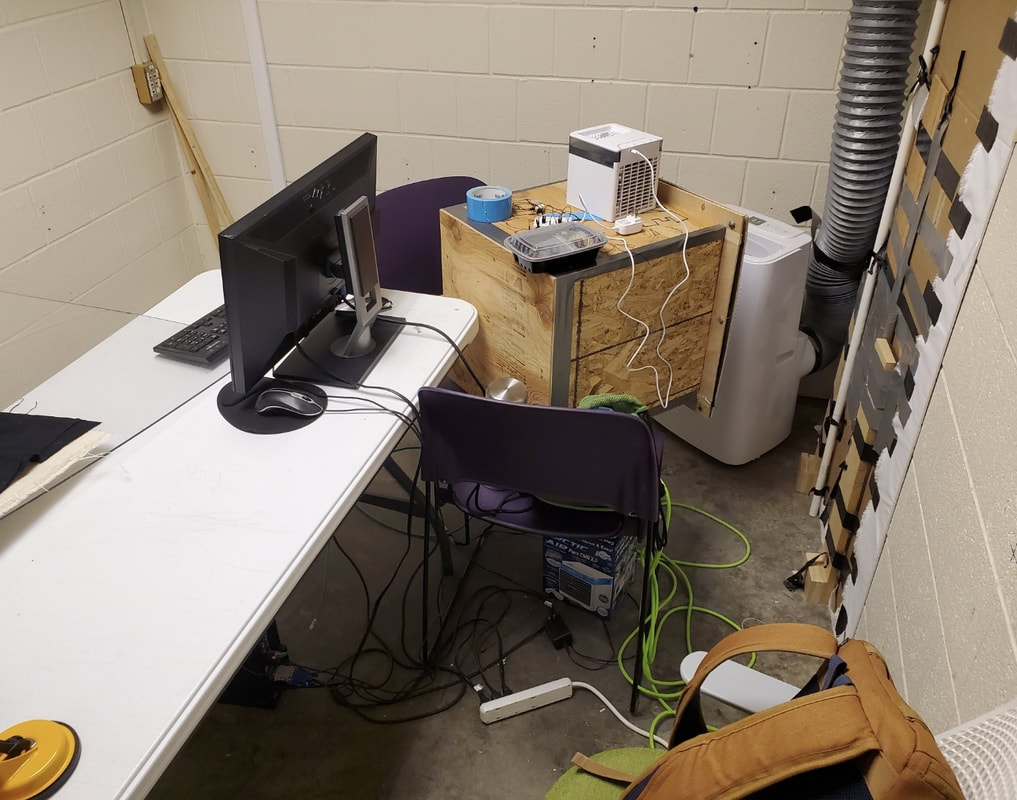
Picture

PRELIMINARY RESULTS

Picture
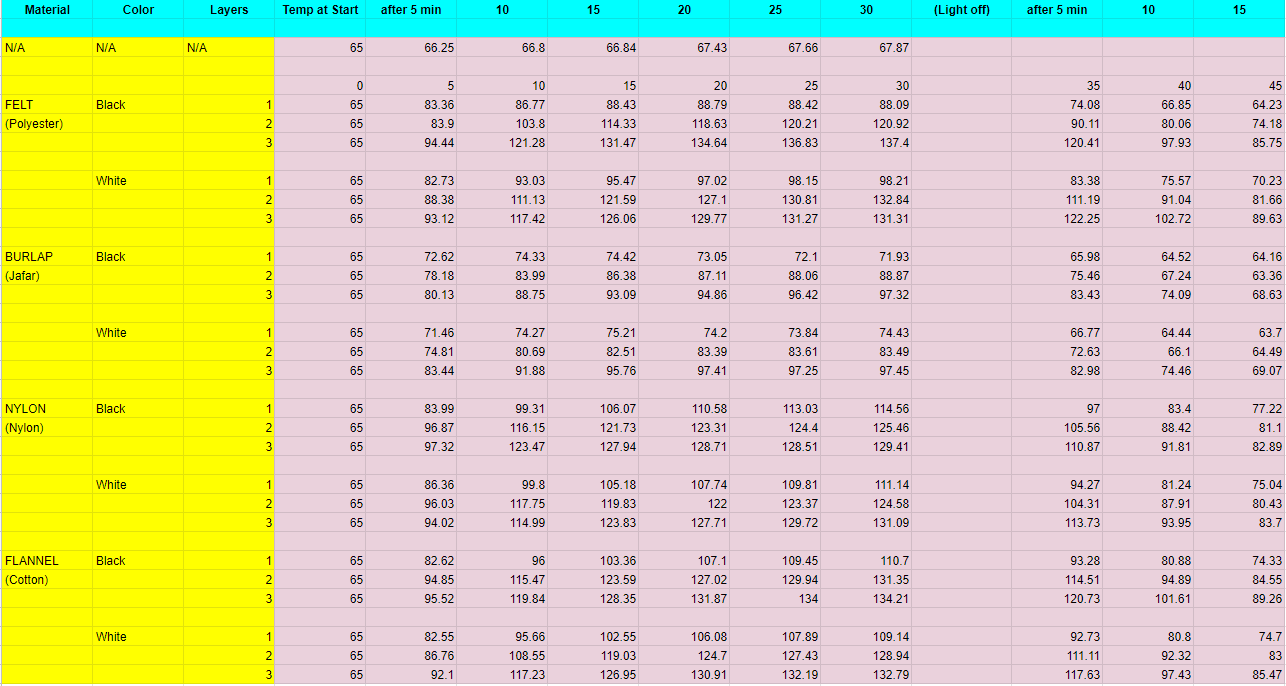
Fig. 24 - These are the results I got my first time attempting the experiment. I used a different setup for recording my results at the time which was less accurate and only required one sensor, so these results became quickly obsolete.

Proposal

Background

Construction

Methodology

Results

  • Projects
    • Environment Box
    • Passive Refrigeration
    • Water Cooling
    • Fog Catching
    • Roof Geometries
    • Optimal Insulation
    • Cooler Windcatcher
    • Green Machine
    • Mitigating Humidity
    • Convective Air Flow
    • Styrene Reuse
    • Thermal Reflection
    • ETFE Rigidification
    • Phase Change Materials
    • Polar Reflection
    • Cavity Depth Variation
    • Vapor Permeability
    • Algae Facade
    • Moisture Buffering
    • Engineered Geometries
    • Recycled Desiccant Materials
    • Living Wall
    • Solar Shading Facades
    • SHADESin.reACTION
    • Low-Fab Dehumidification
    • Breathing Wall
    • Urban Heat Island
    • Acoustical Design
    • Latent Heat of PCM's
    • Insulative Qualities of Air
  • About
  • Lectures
    • Building Science Basics I
    • Building Science Basics II
    • Research & Literature Review
    • Scales of Fabrication
    • Electronics
    • Methodology
    • Graphical Excellence
    • Moving Graphics
  • Assignments
    • 1: Research Proposal
    • 2: Prototype
    • 3: Data
    • 4: Design Proposal
    • Presentation & Paper
  • Workshops
    • Thermal Scavenger Hunt
    • Balance Point Game
    • Advanced Shop Training
    • Basic Electronics
    • Advanced Electronics
    • Excel & Illustrator
    • Data Visualization
    • Videos
    • Animations
  • Syllabus
  • Resources