Methodology
Pre-Conditioning
1. Secure the large hose adapter on to the hole of the back of the enclosure and make sure that it is inserted all the way so that no leaks can occur.
2. Insert the 1/2" clear pvc tube to the hose adapter.
3. Secure the smaller hose adapter on to the Donner DFM-400s fog machine allowing a tight fit around it.
4. Insert the other end of the 1/2" pvc to the smaller adapter.
5. Set up a small fan roughly a feet a way from the enclosure and that it aligns with the opening of the enclosure above the table.
6. Begin preparing variables.
Boiling Water Testing:
a. Place cans that are going to be used in the stack in a bowl large enough for them to fit in and enough room to have it completely covered in water.
b. After the cans are in the bowl, it is time to start boiling water.
c. As the water is boiling, turn on the fog machine and let it warm up for a few minutes. The fog machine will be ready to use when the light turns red.
d. Once water is done boiling, pour the water in to the bowl with the cans and let it sit for 5 minutes.
e. Once the 5 minutes are up, carefully remove the cans from the bowl and place them in their designated spot within the enclosure.
f. Proceed testing for this portion of the experiment.
Cans in Oven testing:
a. Set oven at 450 degrees Fahrenheit.
b. Once the oven achieves 450 degrees, place the cans in the oven for 8 minutes.
c. Remove the cans from the oven carefully and insert the cans into the enclosure.
d. Proceed testing for this portion of the experiment.
Experiment
1. After the cans have been placed, press the button on the fog machine to produce the fog and fill the enclosure until it is completely filled with fog.
2. Turn on fan and have it blow air towards the opening on the lowest setting for 5 minutes.
3. Record visual data and temperature data every minute until the 5 minutes are up and the fog clears out.
Preliminary Methodology
Pre- Conditioning
1. Begin by making a funnel to attach to the fog machine by either bending paper to make a spout. A pipe that can fit a 1 1/2" diameter can be used to attach to the fog machine where the fog ejects from. The fog machine used for this project is a Donner DFM-400s.
2. Purchasing a bottle of 'Fog Worx' liquid fog is required in order to have the fog machine to produce fog. Once it is purchased pour the 'Fog Worx' to the fill line of the of the fog machine.
3. Ensure a tight connection between the fog machine and the testing apparatus and that the vent aligns with the opening of the enclosure above the table.
4. Place cans that are going to be used in the stack in a bowl large enough for them to fit in and enough room to have it completely covered in water.
5. After the cans are in the bowl, it is time to start boiling water.
6. As the water is boiling, turn on the fog machine and let it warm up for a few minutes. The fog machine will be ready to use when the light turns red.
7. Once water is done boiling, pour the water in to the bowl with the cans and let it sit for 5 minutes.
8. Once the 5 minutes are up, carefully remove the cans from the bowl and place them in their designated spot within the enclosure.
Experiment
1. After the cans have been placed, press the button on the fog machine to produce the fog and fill the enclosure until it is completely filled with fog.
2. Remove the fog machine and place a small fan roughly a feet a way from the enclosure and have it blow air towards it on the lowest setting for 5 minutes.
3. Record visual data and temperature data every minute until the 5 minutes are up and the fog clears out.
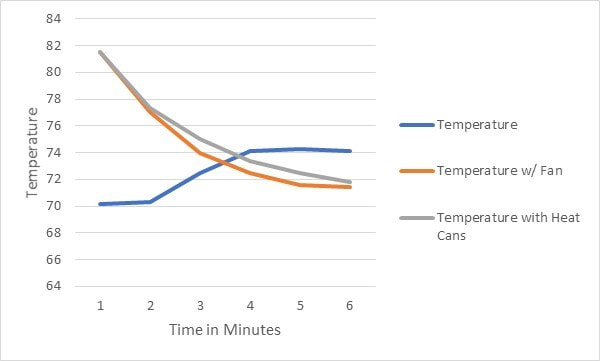
Tests began by gathering the starting temperature before the fans were added to the experiment with the average temperature at the start of the project being around 72 degrees Fahrenheit. After the temperature was gathered, the fog machine was turned on to visualize how hot air enters a room.
After the first test, a fan was added to simulate cool breeze going through the opening of the enclosure. This was to examine how well can one opening work to cool down the space before the heated cans were added. Once the fog machine was turned on, the smoke that came out drastically heated the interior the box from 70 degrees Fahrenheit to about 82 degrees Fahrenheit. Surprisingly with just the fan alone, it brought the space from 82 degrees back to 71 degrees in 6 minutes.
On the final test, the soup cans were placed in boiling water in order to produce heat for the solar chimney. It was able to cool the space down really well but had almost the same results as with just using the fan. The cans did do their job by sucking out the air as it shows in the video below.
Experiment Results